The majority of Databricks customers use production Databricks Runtime releases (AWS | Azure | GCP) for their clusters. However, there may be certain times when you are asked to run a custom Databricks Runtime after raising a support ticket.
This article explains how to start a cluster using a custom Databricks Runtime image after you have been given the Runtime image name by support.
Instructions
Use the workspace UI
Follow the steps for your specific browser to add the Custom Spark Version field to the New Cluster menu.

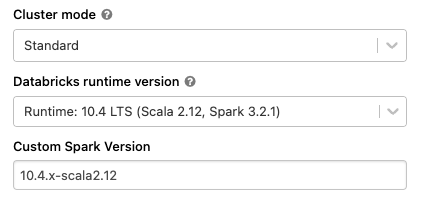
After you have enabled the Custom Spark Version field, you can use it to start a new cluster using the custom Databricks runtime image you were given by support.
Chrome / Edge
- Login to your Databricks workspace.
- Click Compute.
- Click All-purpose clusters.
- Click Create Cluster.
- Press Command+Option+J (Mac) or Control+Shift+J (Windows, Linux, ChromeOS) to open the Javascript console.
- Enter window.prefs.set("enableCustomSparkVersions",true) in the Javascript console and run the command.
- Reload the page.
- Custom Spark Version now appears in the New Cluster menu.
- Enter the custom Databricks runtime image name that you got from Databricks support in the Custom Spark Version field.
- Continue creating your cluster as normal.
Firefox
- Login to your Databricks workspace.
- Click Compute.
- Click All-purpose clusters.
- Click Create Cluster.
- Press Command+Option+K (Mac) or Control+Shift+K (Windows, Linux) to open the Javascript console.
- Enter window.prefs.set("enableCustomSparkVersions",true) in the Javascript console and run the command.
- Reload the page.
- Custom Spark Version now appears in the New Cluster menu.
- Enter the custom Databricks runtime image name that you got from Databricks support in the Custom Spark Version field.
- Continue creating your cluster as normal.
Safari
- Login to your Databricks workspace.
- Click Compute.
- Click All-purpose clusters.
- Click Create Cluster.
- Press Command+Option+C (Mac) to open the Javascript console.
- Enter window.prefs.set("enableCustomSparkVersions",true) in the Javascript console and run the command.
- Reload the page.
- Custom Spark Version now appears in the New Cluster menu.
- Enter the custom Databricks runtime image name that you got from Databricks support in the Custom Spark Version field.
- Continue creating your cluster as normal.
Use the API
You need to set the custom image with the spark_version attribute when starting a cluster via the API.
You can use the API to create both interactive clusters and job clusters with a custom Databricks runtime image.
"spark_version": "custom:<custom-runtime-version-name>
Example code
This sample code shows the spark_version attribute used within the context of starting a cluster via the API.
%sh

curl -H "Authorization: Bearer <token-id>" -X POST  https://<databricks-instance>/api/2.0/clusters/create -d '{
  "cluster_name": "heap",
  "spark_version": "custom:<custom-runtime-version-name>",
  "node_type_id": "r3.xlarge",
  "spark_conf": {
    "spark.speculation": true
  },
  "aws_attributes": {
    "availability": "SPOT",
    "zone_id": "us-west-2a"
  },
  "num_workers": 1,
  "spark_env_vars": {
    "SPARK_DRIVER_MEMORY": "25g"
  }
}'
For more information please review the create Clusters API 2.0 (AWS | Azure | GCP) documentation.